Showing posts with label cake. Show all posts

21 February 2011

Devil's Food Bat Cake with Cream Cheese Frosting


It may seem like it's all pie, all the time in my kitchen, but that's not the case. Sometimes there's cake!

My birthday was earlier this month, and this clearly called for cake. I wanted to use my Christmas gift, the King Arthur Flour Whole Grain Baking book. Yes, you read that right: whole grain cake. This book has an entire chapter devoted to whole grain cakes (and other chapters for cookies, and pies, and oh my!), and I was dying to find out how delicious they could be. Don't worry, this cake is not health food!

What you need:
3/4 cup unsalted butter
1 cup packed light or dark brown sugar
3/4 cup granulated sugar
1/2 tsp salt
1 1/2 cups whole wheat pastry flour
1 cup unbleached all-purpose flour
1 cup unsweetened natural cocoa powder
1 1/2 tsp backing soda
4 large eggs
2 tsp vanilla extract
1 cup plain low-fat or whole-milk yogurt
3/4 cup water

What you do:
Preheat the oven to 350. Grease and flour your pans (2 9-inch rounds, 3 8-inch rounds, or one 9x13).

Cream together the butter, sugars and salt in a large mixing bowl till fluffy and light, at least 5 minutes. In a separate bowl, whisk together the flours, cocoa and baking soda. Make sure there are no lumps.

Add the eggs to the butter mixture one at a time, beating well (at least a full minute) after each addition. Mix in the vanilla. Add half the flour mixture and mix until evenly combined. Add the yogurt and water, and mix again. Add the remaining flour, mix, and stop to scrape the sides and bottom of the bowl once more, to make sure the batter is evenly moistened. Pour the batter into the prepared pans.

Bake the cakes for 30-35 minutes if making a layer cake, or 35-40 minutes if making sheet cake. Remove from the oven and cool for 15 minutes before removing from the pan. Place on a rack to cool completely before frosting.

For the frosting!
I used the frosting from the carrot cake recipe in the same cook book. To make it, let 1 8-oz package of cream cheese and 6 tbs of butter get to room temperature, then cream them together with 1 tsp of vanilla until light and fluffy. Then add (gradually!) 4 cups of confectioner's sugar. To get the intense blue color seen in the picture, add an entire bottle of blue food coloring. Noel (my partner in cake crime!) was not the biggest fan of this frosting, but I thought it was great. More cakes with different frosting are in the future!

The usual response when I mentioned that this cake is whole wheat: "Sweet, I can have another piece!" I can not recommend the KAF cookbooks enough for baking; they are reliable, and prioritize making delicious baked goods above all other considerations. I can't wait to try more whole wheat cakes!

09 June 2010

Pineapple Upside Down Cake


My friend asked for a pineapple upside down cake... I feel like this is one of those things that you were supposed to learn how to make when you were little but I never did. I've actually made some other fruit upside down cakes but not a pineapple. I looked around and basically what I could deduce is a pineapple upside down cake is melted butter and sugar, pineapple rings and then white cake. I don't actually have a standard white cake recipe. I looked around and all the recipes I could find called for milk or buttermilk, neither of which I had. I used the Ultra Orange Cake from the Joy of Cooking (1997 Edition... different than the 75th anniversary edition) and a mash-up of the pineapple part... Oh, apparently PUDC (too long to retype every time) have maraschino cherries... but I hate maraschino cherries, so I used raspberries instead.

Let me just say that I was a little worried about the cake part... it's vegan and from the Joy which are two things I don't usually associate together. But oh man. So you flip the cake over, right? But I had a little extra batter and made some cupcakes with it and the top part made this little sugar crust to break through to get to the cake. Mmm! And the pineapple part was quite nice too, but I think this cake might have been too good for pineapples. It doesn't even need a glaze, I don't think. Maybe a dusting of powdered sugar to make it pretty.

Ingredients
4 Tbsp melted butter
1/2 cup brown sugar
7 pineapple rings (from a can, or fresh if you're fancy)
raspberries (or whatever) to put between the pineapples
1 1/2 cups all purpose flour
1 cup sugar
1 tsp baking soda
1/2 tsp salt
zest of 1 orange
1 cup orange or pinapple juice (I juiced the zested orange and then just used the juice from the pineapple can... if you do this MAKE SURE you are using pineapples in JUICE not SYRUP!)
1/3 cup vegetable oil
1 Tbsp white vinegar
2 tsp vanilla

Directions
1. Preheat your oven to 350.
2. Pour the melted butter into an 8 or 9 inch round pan. Evenly sprinkle the brown sugar over the butter.
3. Place one pineapple ring in the middle and the remaining 6 around the edges. Put a raspberry in the middle of each ring and in any gaps between pineapples.
4. In a medium bowl, mix together the flour, sugar, salt, soda, and zest.
5. In a small bowl or liquid measuring cup, measure out the juice, oil, vinegar and vanilla.
6. Pour the liquids into the dry ingredients and mix together quickly.
7. Pour the batter into the pan. If you use an 8 inch pan, you'll probably have too much batter. But there are no eggs in it, so you don't have to worry about salmonella if you just want to eat it... but you could bake it into cupcakes too.
8. Bake for 35-40 minutes (my oven is so wonky so you might want to start checking at 30 minutes) or until a toothpick inserted in the center comes out clean.
9. Allow the cake to cool for about 5 minutes before flipping it upside down onto a cake plate.

14 April 2010

Chocolate Stout Cupcakes with Coffee Ganache

based off of this recipe who got the idea from this recipe


I am like the birthday cake fairy or something. Anyway, I asked my friend's boyfriend if I should make her a chocolate cake, a rum cake, an espresso cake or a stout cake for her birthday. And he said, and I quote, "How about a chocolate stout cake! Combine two of her true loves (I think I come in third)." So chocolate stout it is! The Bon Appetit recipe seems to be the base recipe for all of the chocolate stout cake recipes on the internet... But I like the Smitten Kitchen version... mostly because it used a better frosting, but also because she HALVED the recipe (and I still ended up with 28 cupcakes).

This cake is super rich and has a really intense flavor. It doesn't taste like stout, but it sort of has the essence of stout. Basically, it's awesome. I am always worried when I try new recipes for people's birthdays since it's kind of important that it tastes good, but this was definitely a winner. I think the coffee ganache goes really well with the cake. Like I said, the cake has such a strong flavor, and I don't think you'd want to have too much frosting to take away from that. Although, I kind of want to make an Irish Cream frosting/ganache in the future...!

Ingredients
Cake
1 cup stout (like Guinness)
1 cup unsalted butter
3/4 cup unsweetened cocoa powder
2 cups flour
2 cups sugar
1 1/2 tsp baking soda
3/4 tsp salt
2 eggs
3/4 cup sour cream (the recipe called for 2/3 cup but I am bad at measuring!)

2 tsp vanilla


Ganache
1 cup semi sweet chocolate chips
1/2 cup heavy cream
1 tsp instant coffee
splash Kahula
splash vanilla

Directions
1. Preheat oven to 350. Line cupcake tray (or trays if you have more than one!) with paper or butter and grease the tray if you don't have cupcake liners.
2. In a medium saucepan, simmer the stout and butter together over medium heat, whisking slowly until butter is totally melted.
3. Whisk the cocoa into the butter/stout. This is going to taste really bitter, so if you are like me and taste everything, don't be surprised/disappointed. I mean, obviously... it's bitter beer and cocoa, what I did I expect it to taste like?
4. Turn the heat off on the burner and allow the mixture to cool a little while you're doing the next steps.
5. Mix flour, sugar, baking soda and salt in a bowl.
6. Beat eggs, sour cream and vanilla in a large bowl. You can do this by hand, but if you are using a mixer, do this at a low speed and keep it on low for everything.
7. Mix stout mixture into egg mixture and beat until just combined. You don't want to mix out all of the carbonation (or nitrogen-ation or whatever it would be if you're using Guiness).
8. Add flour mixture and beat until not quite combined.
9. Fold batter together with a rubber spatula until completely combined.
10. Pour into prepared cupcake pan, fill each cupcake about 2/3 full of batter. Bake for ~25 minutes or until a toothpick inserted in the middle comes out clean.
11. Cool completely before frosting.
12. To make the ganache, melt the chocolate chips, cream, instant coffee, vanilla and Kahula over a double boiler and stir until smooth and shiny. Allow to rest for a few minutes before dipping the cupcakes into the ganache. This made juuuust enough to frost 28 cupcakes (and I made the cupcakes kind of larger than they should have been, so if you have more than this many cupcakes, you might want to add a little more chocolate/cream).

23 February 2010

Beet Velvet Cupcakes (let's not call them Red Velvet, OK?)

A friend told me that red velvet cakes were red because during WW2, there wasn't enough chocolate to go around so people started putting beets into their cakes to make them dark. Buuuuuut, other people have told me red velvet cakes are red because of the vinegar's reaction with the buttermilk. Either way, almost all red velvet recipes call for a whole bottle of liquid red food coloring. I wanted to make red velvet cupcakes without red food coloring, so I decided to try the beet route.


Not really red, eh? I did a lot of things wrong!

I found a recipe that sounded promising. (The owner of that website asks that her recipes not reproduced online, but that we just link to her blog. So I am obliging!) I decided to double the recipe because it seemed small.

I went out and bought beets from the farmer's market. Candy cane beets! They sound so sweet and delicious! But then I get home and after boiling and removing their red skin, I realize they are red and white striped. Like candy canes. I didn't take a picture, but this is pretty much what they look like:

So much white under the deceptively red skin! Oops. I decided to use them anyway because I had no backup plan.

I bought 2 bunches of beets, which in total were 8 fairly large beets. After boiling them, I realized I had no real way to "puree" them--no food processor or masher! We do have a muddling rod for making mojitos though! So I smashed them in a glass measuring cup with that. It totaled just over 1.5 cups which was perfect since I was doubling the recipe. I did a pretty good job smashing them together. Only one person told me he got a bit of beet stuck in his teeth while eating a cupcake!

I followed the recipe pretty much exactly except: I used 1 stick of butter and 1/2 cup of vegetable oil instead of 1 cup; and I didn't have yogurt, so I added a little more milk. I think the yogurt was probably important in developing the red color, since most recipes call for either buttermilk or yogurt. Also, I used some pretty good quality chocolate which made the batter dark. I was still hoping for red, so I added 1/2 bottle of liquid red food coloring.

For frosting, I winged it... 2 sticks of butter, some vanilla and enough powdered sugar to make it taste good. I added some flour and potato starch to make it thicker without making it sweeter and a pinch of cream of tartar to make it fluffy.

I was a little worried, but these taste really good! But they do taste beet-y, while the recipe said they would not. One person pointed out that if I used store bought beets instead of farmer's market beets the beet flavor would probably have been milder. I kind of liked the beet flavor, myself. Some people did, some didn't. You have to be prepared for it though, otherwise it would be a confusing flavor! With the exception of the one person who got a beet chunk, the texture of these was great! Definitely "velvet"!

--On a side note, I used some silicone heart shaped cupcake liners (it was for Valentine's Day aferall!) that my roommate bought for me. I love the idea of reusable liners, especially since I bake so much. But the cupcakes didn't come out super smoothly, just like in regular paper liners. I didn't grease the liners, maybe that is where I went wrong, but they didn't have any instructions! And cleaning them is a bitch because of the ribbed sides, so I have to soak them forever and then scrape the cake out. Just mentioning it!

17 February 2010

Rum Cake (with Rum Buttercream that was only necessary for arts sake!)

I bought a Kitchenaid mixer last week. This is big news! This means I can make cakes all the time without having to borrow my friend's Sunbeam mixer from the '70s which works, but is not nearly as amazing as the Kitchenaid!!!

My friend had a squid eating party last weekend. I don't eat squid (squid and octopuses are the only thing I don't eat because they are too cute to eat...) and in protest I made a cake. I wanted a cake that would be sand colored, and rum cake fit the bill! This is from my favorite cakebook again because I am kind of on a mission to make all the cakes from it... Like all the other cakes I've made from this book, this one was delish!! It is very rich and doesn't reallllly need frosting (I glazed AND frosted it!) but I wanted to frost it to send my message. This would be quite good as a bundt cake, or other cake with a fun shaped pan.


Rum Runner Cake
Ingredients:

Dry
2 3/4 cups flour
1/4 cup packed muscovado (or dark brown) sugar
2 Tbsp potato starch
1 tsp vanilla powder (I didn't have this so I just increased the vanilla extract to 1 Tbsp)
1/2 tsp salt
1/2 tsp cinnamon
1/4 tsp baking soda

Liquid
1 cup sour cream (I didn't have quite a cup, so I filled the rest of the cup with half and half that I had lying around, but yogurt is also a good substitute!)
3/4 cup heavy cream
1/4 cup dark rum (use THE KRAKEN rum if you can, especially when making cephalopod themed cakes!!)
1 tsp molasses
1 tsp vanilla (or more if you don't have vanilla powder

Creaming
2 sticks unsalted butter
2 1/2 cups white sugar
seeds from 1/2 vanilla bean, slice bean down the middle and scrape the tiny seeds out, save the pod!
4 whole eggs
2 egg yolks (save whites for buttercream or omlettes!)

Glaze
1/4 cup simple syrup
1/4 cup rum

Directions:
1. Preheat oven to 350.
2. Line two 8 inch cake pans with parchment paper, don't grease! Or, if you are making a bundt, grease and flour or spray with a baking spray that already has flour in it.
3. Put all dry ingredients in a bowl and whisk to combine. Do the same with the liquid ingredients in a separate bowl.
4. Cream butter and white sugar for 3 minutes on low speed.
5. Add vanilla seeds.
6. Add eggs followed by yolks one at a time, incorporating fully after adding each one.
7. Stop the mixer and scrape the sides and bottom of the bowl.
8. Turn the mixer on medium low and quickly add the dry ingredients and liquid ingredients in 3-4 additions each, starting with the dry and ending with the dry.
9. Stop the mixer and scrape the sides and bottom of the bowl.
10. Mix on medium for 20 seconds.
11. Pour the batter into the pan(s). Bake the 8" pans for about 30-35 minutes (my oven is sketchy, so keep checking) and a bundt for 50 minutes (according to the book) or until the top isn't jiggly and the cake passes the toothpick test.
12. Allow the cake to cool for about 10 minutes in the pan before removing to cool completely.
13. For the glaze, mix 1/4 cup simple syrup* and 1/4 cup rum. After removing the cake(s) from the pans, pour the glaze over evenly (use a brush if you have one) and allow it to fully soak in.

Rum Buttercream
I am lazy and don't want to retype the recipe, but it's exactly the same as the Amaretto Buttercream from the banana cake but I used 1/4 cup dark rum instead of amaretto and 2 Tbsp vanilla. My plan was to cut back the butter, so I reduced it to 3 sticks. The texture was bad. It was way too meringue-y. So I added the last stick of butter and just as I added the last tablespoon, the texture totally changed, so I guess there is some science in this! I used TJ's butter instead of Ralph's and lo and behold, it didn't taste so buttery! So I think the type of butter does matter, but you can add flour anyway if it's too buttery tasting. And if you want to add color, I strongly suggest using the gel because a) it's much more concentrated color and b) the liquid color doesn't mix well with such a buttery frosting! It will eventually after a lot of mixing, but you know... oil and water!

Assembling the cake!
1. Cut tops off of the cake (so they are flat) and eat them! (I never do this, but you are sort of supposed to for nicer looking cakes...)
2. Put one of the cakes on a cake plate.
3. Put a thick layer of frosting on the cake.
4. Put the other cake on top of the frosting.
5. Frost the tops and sides.
6. Add red food coloring to the blue frosting until you get a contrasting color. Decorate with a sad squid.

I always mean to take pictures of the inside of the cake, but it usually gets destroyed in the cutting process. But here it is! The dark clump is muscovado sugar that didn't get fully worked in... don't be lazy with your ingredients like me!


*To make simple syrup: Combine 2 cups white sugar and 1.25 cups water in a saucepan. Add the vanilla bean pod if you want vanilla syrup (this smells SO GOOD)! Bring to a simmer over medium heat and then immediately remove from the heat and allow to cool. Store in the fridge.

07 February 2010

Banana Cake with Amaretto Buttercream

It was my friend Sam's birthday this week and I asked him what his favorite cake was. He said, and I quote, "a banana cake with that bomb frosting on top." Later to be explained as basically banana bread with frosting. I wasn't really interested in making that. Banana bread is good, but it isn't a cake. Fortunately, my favorite cakebook (which I have referenced before), CakeLove had a banana cake recipe called Mr. Banana Legs. I made the Italian Buttercream, also from this book, to go with it.


This cake was delicious!! It was the first time I'd made it and I am always nervous when I make something new. It's not as dense as banana bread and oh man, it is so good. The only alterations I made from the original recipe is that I used amaretto instead of rum (because I didn't have rum) and I used not fresh nutmeg. I've made the buttercream before and it was great, but this time it tasted too buttery (imagine! after 4 sticks of butter!) so I added flour which helped quite a bit. I had used TJ's brand butter last time, and Ralph's brand butter this time, so maybe the Ralph's one was somehow different? But even before when I made it and it was quite good, it was still buttery. Next time I'm going to add an extra egg white and cut out one stick of butter....

Banana Cake
Ingredients:

Dry Ingredients
2 cups flour
1 Tbsp potato starch
1 Tbsp turbinado sugar
1/2 tsp salt
1/4 tsp baking soda
1/4 tsp nutmeg

Liquid Ingredients
3 very ripe bananas (tip! to ripen yellow bananas, put in 300 degree oven until black, flipping over once. allow to cool, then peel)
3/4 cup half and half
1 Tbsp amaretto
1 Tbsp vanilla

Creaming Ingredients
12 Tbsp unsalted butter (1 1/2 sticks)
2 3/4 cups white sugar
4 eggs
3 egg yolks (save whites for buttercream!)

Directions:
1. Preheat oven to 350.
2. Line two 8 inch cake pans with parchment paper, don't grease!
3. Mix all dry ingredients together in a bowl.
4. Mix all liquid ingredients together in a food processor or blender until smooth.
5. Cream butter and white sugar in electric mixer.
6. With the mixer on low speed, add eggs one at at time, followed by yolks one at a time. Incorporate fully after each egg is added. Stop the mixer and scrape the sides with a spatula.
7. Add the dry and liquid ingredients alternately with 3-5 additions each, starting with dry and ending with dry. Do this quickly and don't wait for things to incorporate fully before adding the next.
8. Stop the mixer and scrape the sides and bottom of the mixer. Make sure to get the flour off the bottom!
9. Mix on medium for 15-30 seconds until everything is mixed in.
10. Pour batter into two pans and bake for 25-30 minutes, or until a toothpick comes out clean.
11. Remove from the oven and allow to cool for 25 minutes in the pan. Then remove from pan (remember to remove parchment paper from the bottom!) and cool fully before frosting.

Amaretto Buttercream
Ingredients:
5 egg whites
1 cup white sugar
1/4 cup white sugar
1/4 cup cold water
4 sticks unsalted butter, cut into 1 Tbsp pieces
1/4 cup amaretto
1 Tbsp vanilla
1 cup flour (optional?)

Directions:
1. Heat 1 cup sugar and 1/4 cup water in saucepan until it reaches 245 degrees (use a candy thermometer!).
2. While the sugar mixture is heating, put the 5 egg whites in a mixer and beat until stiff peaks form.
3. Once stiff peaks form, keep mixer running and add 1/4 cup sugar.
4. When the sugar reaches 245, pour into egg white mixture and mix on high for 2 minutes. Then reduce the speed to medium and mix until cooled (about 4 minutes).
5. Add the butter 1 Tbsp at a time and then beat on high until butter is fully incorporated.
6. Add amaretto and vanilla and beat on high until fully incorporated.
7. Taste! If it's too buttery add flour, a few Tbsps at a time, until you like the flavor.

Assembling the cake!
1. Cut tops off of the cake (so they are flat) and eat them! (I didn't do this, so that is why the cake is round on top and sort of falling over. I always think about cutting off the tops, but I'd rather have a slightly larger leaning tower of pisa cake... and so I never actually do...)
2. Put one of the cakes on a cake plate.
3. Put a thick layer of frosting on the cake.
4. Put the other cake on top of the frosting.
5. Frost the tops and sides.
6. Spread 1/3 cup of chopped pecans on a baking sheet. Sprinkle with 1 Tbsp turbinado sugar. Toast/roast for ~7 minutes at 400 degrees, making sure the pecans don't burn.
7. Slice 1-2 bananas.
8. Arrange bananas and pecans on cake to cover up your poor frosting job and to add deliciousness.

24 January 2010

Margarita (Rainbow) Cake

based off of this recipe

I've made this cake twice. The first time, I made it in it's normal color.


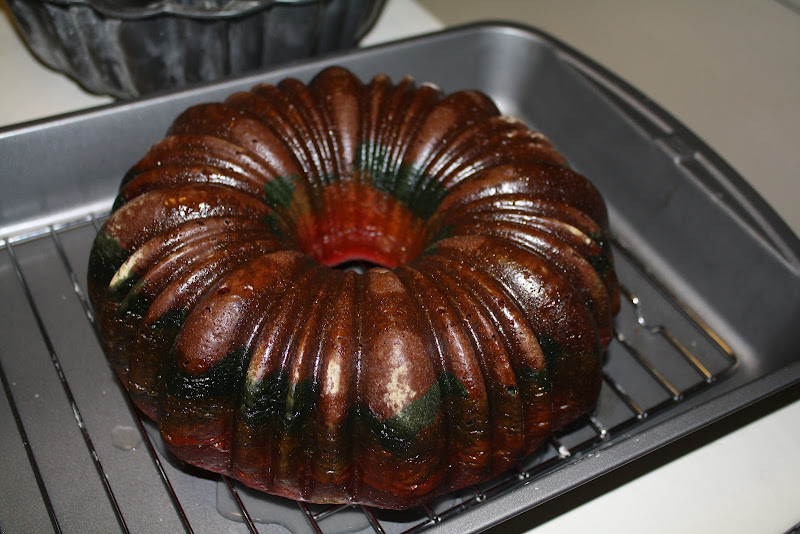
I also made it as my "wild card" entry in the bake-off this week. I made it into a rainbow cake and called it "stumbling over the rainbow" garnished with whipped cream (clouds) and tequila (a pot of gold!). I have made a few rainbow cakes before. I got the idea from my friend Sarah, and learned how to do it from this blog, which explains how to make a layer cake. A bundt is a little different.


The first time I made this cake it was AMAZING. This week when I made it, it was good, but not great. I made it exactly the same (except for the colors, of course) and I think the problem was the limes. I tried one of the limes and it just didn't taste very good. There is a lot of lime juice in both the cake and the glaze. So, my take home message is, don't make this cake unless you have delicious limes!

Onto the cake!

Ingredients:
1 package of Betty Crocker French Vanilla Super Moist Cake (or other vanilla box cake)
1 3.4oz package of instant vanilla pudding mix
4 eggs
2/3 cup orange juice (no pulp)
1/2 cup vegetable oil
1/4 cup lime juice
1/4 cup reposado or silver tequila--cheaper quality is fine, but I would recommend against "gold" tequila (I generally am against "gold" because it has fake flavors) and "anejo" tequila (because it is more expensive and has a stronger flavor)
2 Tbsp triple sec (cheap is fine here too)

2 cups powdered sugar
1/4 cup lime juice
2 Tbsp tequila (same rules as above)
1/4 cup triple sec or higher quality orange liqueur (I use Contreau)

coarse salt for garnishing

Directions:
1. Preheat oven to 350F and grease and flour a bundt pan. I am always worried about cakes not coming out of the bundt pan, so I always flour well!!


2. Combine first 8 ingredients in a large bowl. Mix until combined thoroughly.
if you want to make this as a regular cake, just pour all of the batter into the bundt and skip to step #7

3. To make a rainbow cake, separate the batter into 6 small bowls.
4. Add food coloring to the bowls. Use gel food coloring instead of liquid, if possible. Gels make a might brighter dough.


5. Keep adding colors until very bright. I don't think you can over-color. Purple is the hardest color to make, but you can do it! Mix thoroughly.


6. Put the colors in the pan. Purple first, them blue, green, yellow, orange and red.


7. Bake for 45-50 minutes or until a toothpick or chopstick inserted into the middle of the pan and comes out clean.
8. While the cake is baking, make the glaze by combining the powdered sugar, 1/4 cup lime juice, 1/4 cup triple sec and 2 Tbsp tequila and whisking until smooth.
9. When the cake is ready, remove it from the oven. Pierce the cake with a fork several times. Pour 1/2 cup of the glaze on the cake. Allow to sink in for 10 minutes.
10. After 10 minutes, flip the cake over onto a cooling rack that has been placed in a large tray or baking pan (so glaze can drip off without making a mess!).
If you used the coloring, the cake will not be pretty! Because of the purple food coloring and the butter from the pan, it looks brownish. Don't worry!


11. Pour 1/3 of the glaze (about 1/4 cup) on the cake. Wait ~15 minutes. Pour another 1/3 on. Wait another ~15 minutes, then pour the last 1/3 on. Make sure the whole cake has been covered with glaze. Use a brush if you have one.
12. Once the cake has fully cooled, squeeze lime juice over the cake and sprinkle with coarse salt.
13. Cut and serve!


Notes: I arranged the colors the way I did because I knew I wanted to arranged the slices of the cake on the plate to look like a whole rainbow. I wanted the purple end in the middle and the red end on the outside, so I made the purple the round end. If you are going to serve this just as single slices, I would put the red in the bottom because the colors will look more like a real rainbow.

22 January 2010

Chocolate Cake with Coconut Buttercream and Ganache Drizzle

I participated in a bake off this week for a friend's birthday. This one was the winning cake! I have made the chocolate cake from this many times and it is super easy to make and very tasty! The frosting is a little more work, but it is totally worth it.


Chocolate Cake (from this recipe exactly, except I increased the vanilla)

Ingredients:
2 cups white sugar
1 3/4 cups flour
3/4 cup cocoa powder, sifted*
1 1/2 tsp baking powder
1 1/2 tsp baking soda
1 tsp salt
2 eggs
1 cup milk (this time around, I used whole milk, but I usually make this cake with skim milk and it comes out fine! the cake is a little stickier with skim milk, but still tastes great)
1/2 cup vegetable oil (I use canola)
1 Tbsp vanilla
1 cup boiling water

Directions:
1. Preheat the oven to 350F and grease and flour 2 8" round pans.
2. Mix the sugar, flour, cocoa, powder, soda and salt in a large bowl.
3. Add the eggs, milk, oil and vanilla and mix until well blended.
4. Add the boiling water. I think according to the original recipe, you are supposed to add it slowly, but I just pour it all in and mix until blended. The batter will be very thin.
5. Pour the batter into the two pans.
6. Bake 30-35 minutes in the oven, or until a toothpick inserted in the middle comes out clean.
7. Remove from oven and allow it to cool in the pans for 10 minutes. Then remove from pans and allow to cool completely before frosting.

*normally, I don't sift things because I am lazy.. but with cocoa I think it's important to sift because there are always clumps of chocolate, and you want to make sure it will mix properly!


Coconut Buttercream (recipe taken directly from this book which is one of my favorite cakebooks!)

Ingredients:
Milk Mixture
2 cups whole milk
1 1/2 cups shredded coconut (the recipe calls for 1/2 cup, I've made this twice and the first time it was not coconutty enough, so I added more)
3/4 cup + 2 Tbsp white sugar

Yolk Mixture
6 egg yolks
1/4 cup white sugar
3 Tbsp potato starch
4 Tbsp room temperature butter (1/2 stick)

Flavorings and Butter
1/4 cup muscovado (or dark brown) sugar
1 Tbsp coconut rum
1 Tbsp vanilla extract
1 lb chilled butter (4 sticks), cut into tablespoons

Directions:
1. Pour milk mixture ingredients into a medium or large saucepan.
2. Bring to a boil over medium-high heat, stirring.
3. Remove from heat and allow to cool for 10 minutes.
4. While the milk mixture is cooling, put the 6 yolks, 1/4 cup sugar and 3 Tbsp potato starch in a medium bowl. Whisk to combine. Add 4 Tbsp room temperature butter but do not mix.
5. After 10 minutes, return the milk to a simmer. (I forgot to do this step the second time and it came out fine!)
6. Once it reaches a simmer, slowly pour the milk mixture into the yolk mixture, whisking until fully combined.
7. Pour back into the saucepan and heat over medium high heat for 4 minutes or until the sauce thickens (and when you see "lava bubbles" as the book calls it, meaning large bubbles that pop slowly). Whisk constantly to prevent the cream from cooking on the bottom of the pan.
8. Reduce heat to low and whisk for 1 minute.
9. Pour the cream into a stand mixer. Add muscovado, rum, and vanilla and beat on high for 4-5 minutes or until cream gets down to room temperature.
10. Reduce mixer speed to medium-low and add the chilled butter one tablespoon at a time.
11. After all butter has been added, whip on medium speed until smooth, about 2-3 minutes.


Ganache
Ingredients:
2 cups chocolate chips
1 cup of cream
favorings of choice to taste! I used vanilla and Contreau

Directions:
Add all ingredients to a double boiler (if you don't have a double boiler, here is a way to make one with pots you have) and heat, stirring constantly until smooth.


Assembling the Cake
1. Cut the cooled cakes in half, so you have 4 circles (layers).
2. Put the bottom half of one cake on a cake plate.
3. Put a thick layer of coconut buttercream on the cake.
4. Take the top of the cake and put it upside-down on the buttercream, so the rounded side is down and the flat side is up.
5. Pour a layer of ganache on the cake.
6. Put the bottom layer of the other cake on the ganache.
7. Add another later of buttercream.
8. Put on the top layer of cake, round side up.
9. Cover the the top and sides with buttercream and drizzle with ganache (I used a spoon).
10. Allow frosting to set and ganache to cool before serving.