
Making bread is one of those things that seems intimidating at first, and then becomes so easy that you can't believe you haven't always done it. Our house has seen a steady supply of homemade bread lately, since all three of us bake, so that we haven't had to buy the pre-sliced variety in months.
For me it started with my mom's family recipe rolls. I resisted making them for years because I was afraid I'd dishonor the Lickey family legacy if I screwed it up. But last Thanksgiving I gave in, and discovered how fool-proof it is.
This recipe has a history: my mom's family has baked it since the pioneer days, when no one had measuring cups and you couldn't buy yeast and had to use potato water instead. (I never understood how that worked until Heidi got the King Arthur Flour Baker's Companion, my new favorite baking book. Apparently, there is wild yeast in the air all around us, and this can be harnessed for bread baking in the right conditions. Starchy potato water is particularly good for attracting wild yeast!) Anyway, when my grandmother made this bread she still used the lard called for in the original recipe. Sure, I thought they were delicious, but in all honesty I never noticed the difference between lard-rolls and my mom's margarine version.

In any case, the rolls (or bread) from this recipe are amazing – chewy and starchy and perfect for holiday dinners. For every day eating, though, I prefer whole wheat. So I'll share the original recipe, then my own whole wheat variation, with bread-making tips from King Arthur.
In a large mixing bowl, combine one handful of sugar, one cup of warm water, and 2 ¼ tsp (or 1 package) of yeast. Stir it around a bit and let it sit for 5-10 minutes. It should get a little bubbly on the surface because yeast is alive and it is eating the sugar, yum! If it doesn't bubble your water was too hot (or cold) or your yeast was bad, and you need to start over.
Add 4 cups of warm water, two handfuls of sugar, one handful of salt, 1/3 cup of butter, and enough bread flour to get the consistency of cake batter. Beat this really well, but don't worry if the butter isn't completely combined. The kneading will take care of that!
Continue adding flour until the dough forms a firm ball. You will end up using most of a 5-pound bag of flour. Flour tip: My mom strongly recommends King Arthur bread flour, though I think just about any variety, including all-purpose, will work just fine. This is a pretty forgiving recipe.
Dump your dough out onto a well-floured surface and knead the dough until it is smooth and elastic, 10-15 minutes. If the dough seems really sticky, you can incorporate more flour, but be careful – adding too much flour is the most common bread mistake!
Place the dough in your largest mixing bowl, lightly greased, and set it somewhere warm to rise. Rising time can vary depending on the temperature, the mood of the bread gods, and the amount of wild yeast floating around your kitchen; but it should be at least doubled in size in 1-2 hours.
Punch down the dough monster and separate it into greased pans. You can either form it into rolls at this point or just leave it one big blob per pan if you want loaves. This makes a lot of bread – I usually get about 3 cake pans full of rolls, sometimes more! At this point you can put it in the fridge to slow rise over night, or just leave it on the counter for about 20 minutes before baking. You can also leave it out a lot longer.
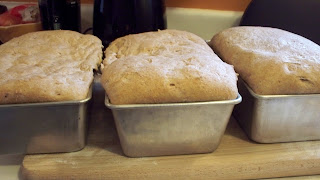
Bake at 375 degrees for 30 minutes (for rolls) or 45 minutes (for bread loaves). If you are making these for a holiday dinner, you should definitely eat one immediately after it comes out of the oven, just to make sure they're okay. I think at this point Bekkah has made this rolls recipe more than I have, so maybe she has tips to share!
For whole wheat goodness: When I have these rolls in my house, I don't eat anything else, so I had to come up with a whole wheat version for daily consumption. I generally add flour one scoop at a time, so to make this recipe whole wheat I just alternate between scoops of regular bread flour and whole wheat flour. If it's your first whole wheat attempt, start by using a 1:1 ratio of whole wheat to white flour. My last two batches were made with a 2:1 ratio, and have turned out fantastic. Whole wheat flour doesn't rise as easily as bread flour, so I help it out by adding a few heaping teaspoons of vital wheat gluten (sprinkle it over the dough while you're adding flour). This is a completely optional ingredient, but my bread does rise very nicely. If you are really a health nut, add some milled flax seed for omega-3s and a multi-grain taste. Divide your dough into three loaf pans and bake as above. Cool on a drying rack, so the bottoms don't get soggy. Decide how much your house will eat before it goes stale, and put the rest in the freezer for future consumption. Feel smug and superior for making your own tastier, cheaper, and healthier alternative to store-bought bread!
Sugar tip: The two handfuls of sugar can be replaced by about 1/3 cup of honey, molasses, or whatever liquid sweetener you desire.
Rising tip: If your house is like mine, finding a warm place for the dough to rise is the biggest challenge of making bread. My mom recommends the top of the fridge, though the top of my fridge does not feel particularly warm. You can warm up your kitchen by cooking other things while your dough rises; if it's the holidays, time it so the dough is rising while something else is in the oven, and just set the bowl of dough on the stove. I usually end up putting the bowl in the oven and setting it to warm for a few minutes, then turning it off. The oven should stay warm for long enough to make your dough happy.
King Arthur has some kneading tips! Once you have formed the dough, let it rest for 20 minutes before you start kneading. This lets the flour absorb all the moisture. Kneading can also be easier if you take a 5 minute break half-way through the process; this allows the gluten to relax a little, which for some reason helps.


